Openbeam self balancing robot
Posted by Jim Morris on Mon Dec 03 02:26:22 -0800 2012
Having some time on my hands I have taken up several hobbies. One is 3D printing, and the other is restarting my robot hobby.
The 3D printing is a whole other story, and I'll probably blog about my adventures in modifying and building a Delta printer soon.
For the robot hobby I decided I'd try to build a self-balancing robot. They are all the rage and there is plenty of stuff on the Internet about these little creatures.
Basically it is a two wheeled robot that uses an IMU (Inertial Measurement Unit) to keep its balance (a bit like a Segway).
You only need a 6DOF one but I also got the 9DOF) to play with as it was on sale.
My initial attempt was to build one with my old Lego Mindstorm kit. This worked OK, but not really stable. I suspected the old Lego motors did not have enough torque to keep it stable, plus no wheel encoders.
In looking into 3D printers I came across those big boy Lego kits called Aluminum Extrusions. Many companies and varieties exist, 8040, Misumi (Google them). But there is also the Openbeam which is somewhat smaller at 15mm a side. I got a hold of some of this at my local Techshop. I printed the accessories (edge connectors etc).

I designed the bot to make sure everything will fit in Openscad, I like this way to design 3D objects being a programmer, as you program the objects instead of draw them. I learned to use Openscad so I could design objects to print on the 3D printer.
For this second iteration I am using similar components to others who have successfully managed to get a stable balancing robot. Pololu 37D geared motors (19:1 gear ration), big Wheels etc.
So I have built the robot, now I just need to hook up the electronics. I am going to use the new Teensy3 a cheap Arm based Arduino type clone. (I used the Teensy++2.0 for the Lego based robot), and the Pololu Dual MC33926 Motor Driver Carrier.
We will see how well I do this time around. Oh and I am using the Arduino PID Library to do the PID calculations.
Here is what the actual bot looks like without the electronics.
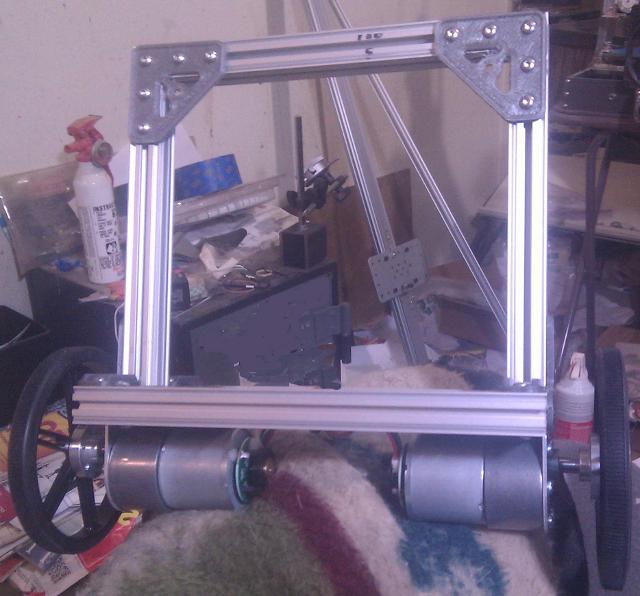
Yes that is Makerslide in the background. More on that later :)
One issue I had was cutting the Openbeam. I tried using a hacksaw while the Openbeam was in a Miterbox, but I could not get clean straight edges.
So after googling a while I bought a small Mitre saw from Home Depot (Ryobi 7-1/4 in. Miter Saw With Laser), and a cheap 40 tooth blade (Avanti 7-1/4 in. x 40 Tooth Finish Circular Saw Blade). It cuts really well, clean straight cuts. (Wear eye protection!!)
UPDATE The first time I powered it up it seemed to work fine, then as soon as I started to tune the PID, and the motors started oscillating the Teensy3 fried! All other components seem OK. I don't know if this was induced current or what, I certailnly was not overloading the Teensy3, and the Motors were on a completely isolated circuit. I think the Teensy3 is maybe too sensitive for this application, so I'll go back to using the Teensy2++ for now. Just in case I'll drive the motor driver input through some TTL logic gates, it'll save some pins anyway.
Have you tried using a cheap multitool with a half moon cutter attachment to cut the metal?
That might help cut straighter than using a hacksaw.
Also, one tip on Arduino is that if you have the socket model the chip itself is a programmable microprocessor/controller, instead of rebuying more complete boards, after you program using the circuit board, the chip which is only about $4 or $5 etc.., you can remove the chip from the Arduino circuit board and add a oscillator to act as the signal and place a socket on another board and power it with seperate wiring, that makes it to where you only need one Arduino board and use the board as basically a chip programmer. To reprogram or update the chip, you'd remove the chip from socket on your custom circuit board, place it back on the main (programmable) Arduino board, reset the data on chip and update the code then remove the chip and place it back on the your custom board.
You can also set it up where you use SD card for storage of data on the custom board.
Hi, could you explain or show how do you fix the motors and the electronics?
And could you post the sketch?
Thanks!!!
Hello,
thanks a lot for sharing your project, it is great for beginners like me.
I am beginning with Openbeam and I have a few doubts with it. How do you fix the motors to the chassis? I am planning to use micro metal gear motors from Pololu.
ANother question is with the sketch, would be possible to download this?